
The format of this blog-post will be some very basic advice (for someone who's never done this at all), followed by my more in-depth top 15 advice list.
Basic Steps (that many readers will already know):
1. Disassembly is a must: Why? Because even the steadiest hand and the finest brush won't allow you to brush paint right up to the windows, without getting it ON the windows. You HAVE to take the windows out. Plus, without taking the windows out, the inside metal of the car won't be painted, and will still be visible in the old color.
We've all seen the gross flea market cars where some kid has attempted to change the color of the car, using some poster/tempura paint, with paint all over the windows, or WITHOUT paint in the new color going all the way up to the window. So bite the bullet and realize that although disassembly is a pain, it makes everything MUCH easier...
Most cars have 4 main pieces - the diecast body (top), the baseplate (metal on old cars, plastic on new cars), an interior, and the plastic glass, plus the 2 axles with wheels. Older cars may have more than 4 pieces (opening doors are individual pieces, sometimes there are multiple body pieces, or separate grills, etc.). It'll all be pretty obvious once you get the car apart.
On older cars (which are my favorites - and so also my favorites to respray) the glass is often held in place with another rivet on the underside of the roof. For the glass rivet, I actually use a really large (wide) drill bit, since if I start with a tiny drill and try to make a pilot hole I'll actually drill right through the roof. Instead I just try to remove enough of the expanded part of the rivot to allow the glass to pull away from the roof.

3. Paint ONLY using spray paint: Again - this is a fairly hard and fast rule. Don't try to brush paint a car - since you'll have lots of brush marks at the end, and the paint won't be smooth. Spray painting is THE way to go to get a nice, smooth, professional looking finish (more on this later). I've brush painted trim (headlights, taillights, sometimes grills, etc.) with moderate success. But I've had very little success brush paining body panels (like doing a 2 tone paint job) since again the paint often dries with visible rough paint marks, and my hand is just not steady enough to make clean and straight lines with a brush.

Top 15 advice list:
15. Don't even start this project if you are not detail oriented/a perfectionist! It's finicky, intricate, detail oriented stuff that you are doing. If you aren't detail oriented, or don't really care about it, then it's just not worth doing. Save yourself the time now! But on the other hand if you are detail oriented and you love your diecast cars, then re-spraying them into a new car is a very do-able and satisfying project!

13. The final product will be valueless: In general, code 3 (customized) cars are not worth anything besides their curiosity value. So DON'T paint a high value nice condition car (it's a bad investment - plus it'll piss off other collectors who will think you ruined it!). YOU are probably the only person who will truly appreciate the end-product!
12. Be realistic about the time required: Painting cars always takes longer (a LOT longer) than I expect. This is not a one hour project!
11. (Related to #12 above) Do more than one car at a time: Doing multiple cars allows you to pick up some volume efficiencies from doing each of the various steps. But don't do TOO many cars - or else you'll get overwhelmed, you'll get tired and start to rush, or it'll get too hard to remember which parts go with which car. In my opinion about 4-5 cars is the optimal number to do at any one time.
10. (Related to #12 above...) Patience is key. Don't rush, take your time. It's ok to redo a step.
9. Choose your projects carefully: Only do cars/castings that you really like. If you don't like the casting design BEFORE you paint it, you won't like it that much more AFTER you paint it. And if you don't like it, you won't be inspired to really put the time and energy and patience into making the final project look terrific.
Also consider the condition of the cars that you are doing. While scratched window glass can be mostly repaired (dip the glass into a container of MopandGlo and let it dry - the MopandGlo will fill in the scratches amazingly), I've never figured out how to repair/unbend axles (though there are plenty of guys out there who CAN do this), and I've never figured out a good way to repaint wheels without having the new paint look all blobby. So either be OK with the faded wheel paint, or replace them with new wheels from other donor cars (easier said than done - since the wheels and axles need to be the same size and width or they won't work!).
In summary - do cars that are in poor enough condition that you don't feel bad about ruining their originality, but in good enough condition that the unrestored parts of them won't detract from the new paint
8. Spray painting cars is both incredibly easy... ...but can also be surprisingly tough. Do smooth passes, a few inches away from the car. I put the car on a painting block that I made on 8 inch lengths of 2 inch wide pine boards, sitting on nails pounded into the board (to keep the bottom lip of the body from touching the block), which allows me to turn the block for different passes from different angles. Do the passes slow enough that you get good paint coverage, but not so slow that the paint collects on it and starts to drip/run. You DON'T want thick paint - it'll dry funny - and it obscures all the great Lesney detail that made you like the car in the first place! If you get the paint on too thick, just wipe it off with paint thinner (a NECESSARY item to have for this project) and respray it. Allow the paint to slightly dry (10-20 minutes) between coats. Allow the paint to dry much more (several hours) before handling the casting AT ALL , or before turning the casting upside down to do the inside and bottom (as well as getting a different angle on the outside of the casting). In the unlikely scenario that the paint is NOT covering and you keep on adding more coats and it continues to not cover - it's probably too wet and is running. Let it dry (or if already too drippy - wipe it off and start over).
7. Choose your paint carefully. Get several different colors and types of paints. Some paints work great - others don't - even if they are from the same brand/type of paints.
Choose your colors carefully as well. Some colors look great - others just don't. About 10-20% of the time I'll spray a car and then think that I just don't like the way the color looks - it's too dark, or too muted, or too crazy and unrealistic, or just wrong somehow, and I'll wipe it off and redo it in a different color.
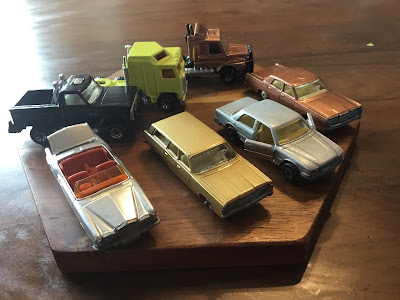
I've had REALLY good luck with metallic colors - bronzes, coppers, silvers, etc. You'll see several of these colors in the photos of the recently done cars. In fact, that bronze color on the Lesney Mercury sedan and Scania tractor is my FAVORITE paint color ever - I've probably done 10+ cars in that paint color (and it's a big standard sized Rustoleum spray paint can available for $5 from any WalMart/Home Depot). When I first started spraying cars I used the little 4 inch Testor cans available from hobby Shops - but I'm not convinced that those Testor cans are any better than standard (and much cheaper on a per ounce basis) Rustoleum cans (though the Testor cans DO come in a wider variety of colors!).
When choosing a color - think about how realistic it will be. Most real cars are painted white, black, silver or red. Unfortunately, I haven't had great luck with the particular white or red shades that I've tried so far. And I don't like black since it hides rather than shows detail. Painting a luxury car a wild shade of purple or lime green is going to look a bit odd, though those can be great colors for muscle cars.
6. You don't need to strip all the paint from the old casting, but consider sanding it a bit to hide any existing paint chips: Using paint stripper is messy, gross, environmentally unfriendly and it adds a lot of time to the process. Most spray paints will provide excellent color coverage, and you won't see the old paint once the new paint is on. However, if the old paint was significantly chipped, you MAY see the outline of the chips clearly visible in the new paint. Therefore while I've stopped stripping the castings, I DO use a Dremel tool with a wire brush wheel attached to quickly sand/smooth the old paint and smooth down any chips. I don't worry about getting every speck of the old paint off unless it is really thick and blobby, or if it is so thick that it hides important metal detail in the casting.

Other customizations that I've done include: 1. Cutting the roof off and making a convertible (cutting the roof off is easy with a Dremel cutting blade, but reforming the back deck into the shape of a convertible top can be pretty difficult), 2. doing base plate swaps with other versions of the same casting, 3. changing wheels, 4. eliminating or adding huge off-road wheels (be warned that this can be pretty hard, etc.
4. Be VERY careful of fingerprints: Avoid any serious handling of the car until the paint has had a chance to harden (overnight is best). If not, when you pressing the hood/trunk/roof of the car to re-mate it to the baseplate - you'll transfer your fingerprints into the paint. Seriously. Learn from my mistakes - I've done this mistake WAY too many times!


1. Use superglue to put the whole thing back together: Serious restorers tap new screws and screw the body back together. But I've never figured out how to do this - and frankly - superglue is a lot easier!
Finally, enjoy your new and unique look!
No comments:
Post a Comment