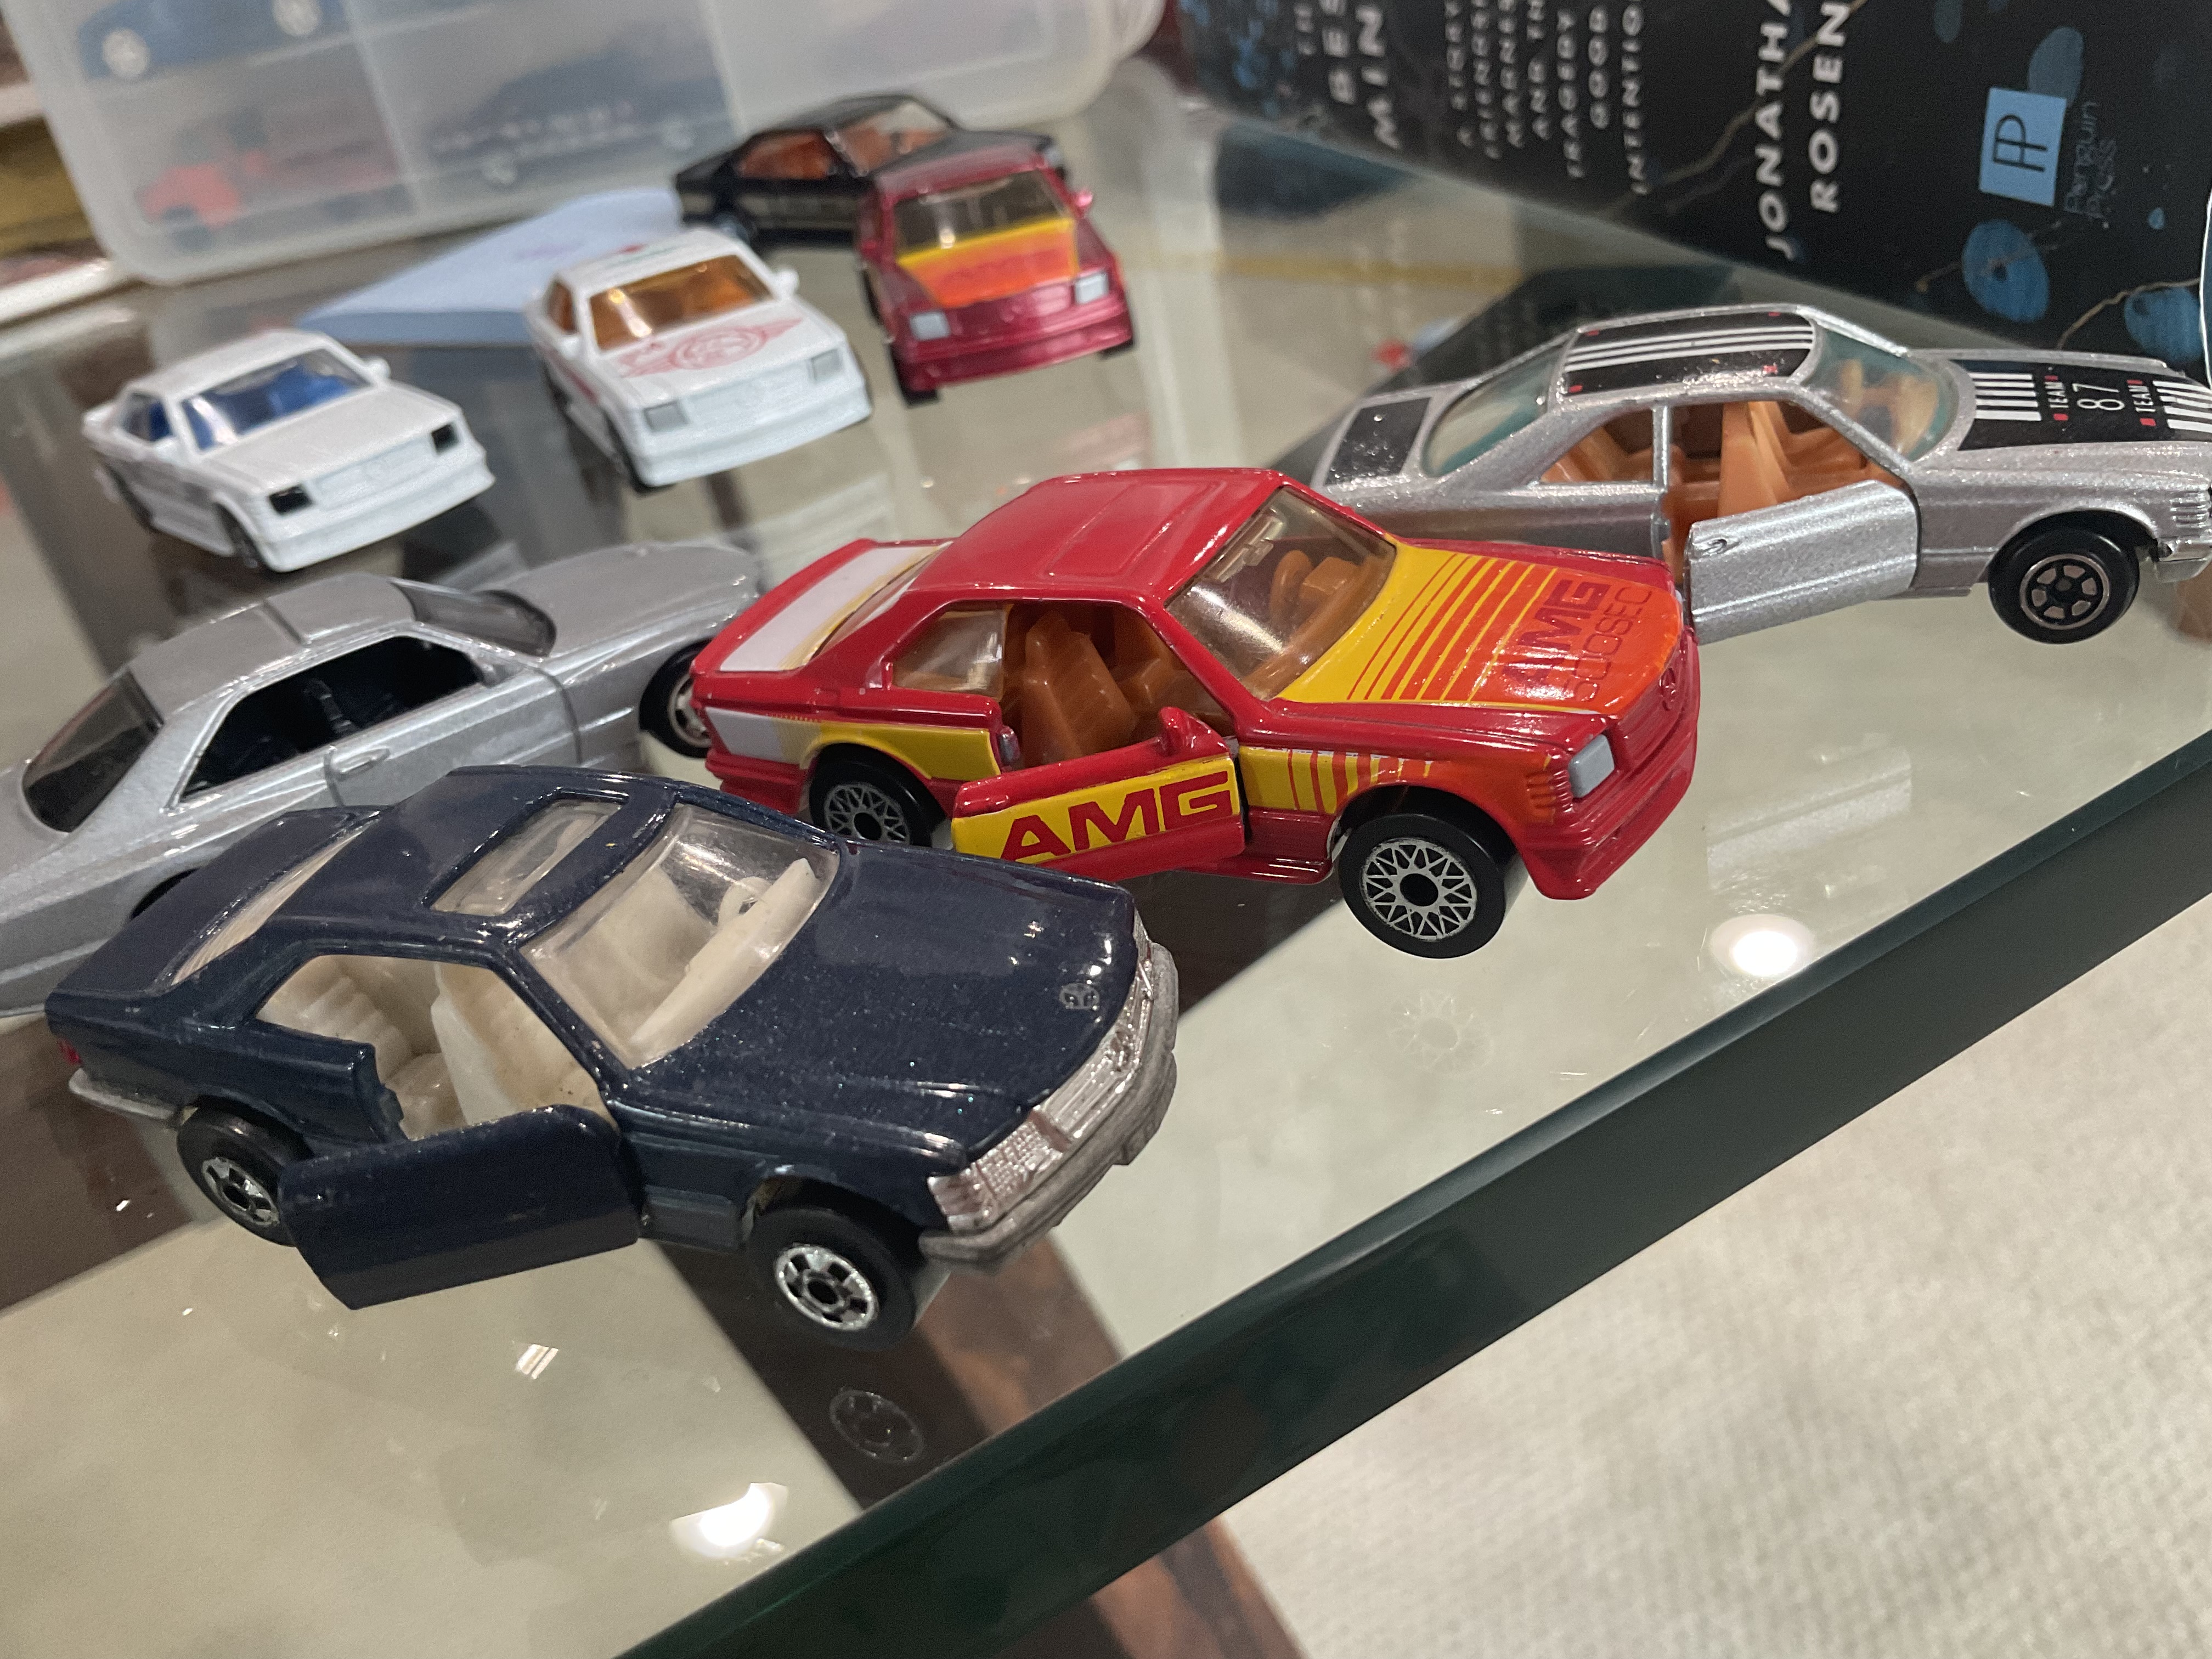
Total Pageviews

Tuesday, January 24, 2023

All else being equal, are mint condition cars always preferable to non-mint condition cars? Answer: NO!

This sounds obvious, but...:

...Aren't mint condition cars ALWAYS preferable to non-mint cars?  No!

You see it all the time in die-cast car forums, where they will describe a reasonable but non-mint car as a "filler", a temporary place-holder until you can find a mint-condition example of that casting.  As if to say, that the only purpose of a non-mint car is to be a place-holder until you find the "better" mint example.  

Which begs the question, are there ANY instances where, all else being equal (color, variation status, wheels, etc.), you'd actually prefer a non-mint car over a mint car?  

...And my answer to that is a resounding YES! 

Now, to be clear, this IS the exception rather than the norm.  For the most part, better condition cars are almost always preferable over worse condition cars.  And broken cars are ALWAYS less desirable than non-broken cars.  But...  ...there are situations where I actually prefer the non-mint car over the mint car.  

Some of it comes from the sense of sentimentality, that the specific non-mint model in question may hold sentimental feelings for you, that you remember playing with that SPECIFIC model as a kid, and the mint model just can't compete.  

But some of it also comes from the fact that to my eyes, the mint models are sometimes TOO shiny.  And the non-mint but good condition model may somehow look more like an ordinary car on the street, with a little less shine, and few more scuffs.  This is particularly the case for cars that are SUPPOSED to have scuffs - for instance pick-up trucks - or rally cars - rather than Rolls Royce's or Cadillacs.

I instantly thought of 2 real-life examples.  And they are from 2 of my all-time favorite Matchbox castings - the Mercedes AMG 500 SEC, and the Red Transitional Superfast Ford Pick-up.  In both cases I compared highly beat-up examples (left-most), with mint examples (right-most), and with good "filler" examples (center).  

And in both cases, I found that the played-with-good condition examples just had something about them that the mint examples lacked - some sense of old-car realism (particularly relevant for an old pick-up truck) combined with a unique "come-play-with-me" siren call.  

To be clear, it doesn't hurt that both of these middle examples also have that sentimentality going for them.  In both cases, these specific examples were the actual first examples of these castings that I ever had.  In the case of the 500SEC, it was a casting that I had desired as a kid but didn't actually get until a decade later as an adult collector.  And in the case of the pick-up, this was a casting that I literally had never before seen, until the day that I pulled that actual truck out of a $.50 bargain bin at a Matchbox collector flea market, marveling that such a great casting even existed.  But I don't think that sentimentality is the only thing going for them, instead I think that I would prefer them even without that sentimentality.  
 

So what do you think?  Am I completely off-base?  Or is there something about the playwear that is magical - some sense of "Velveteen-Rabbit"-esque toy-magic - gradually imbued on them by countless hours of childhood play?  

Tuesday, January 17, 2023

Can any other diecast E32 BMW compare to the beautiful mid 1980's Matchbox 323i cabriolet? ...Enter the Hot Wheels RLC M3!

Matchbox' wonderful 323i cabriolet has always been a favorite casting from the "Matchbox Int'l" mid 1980's era of my later childhood.  In fact the blue 323i pictured, a little rough from lots of play, is indeed from my childhood, one of 4 cars purchased at Bordens in Point Pleasant Beach, NJ (the other 3 were the Escort XR3i cabriolet in white (love that casting!), the 2 door Jeep Cherokee, and oddly large VW Golf GTI in red).

While I'm still partial to the blue car, the other colors shown are also nice, particularly the pure white.  All examples have marvelous wheels.  I love the 8 dot wheels of that time, particularly the glorious gold wheels on the red car, but I'm also partial to the laser c/d wheels on the white Alpina car. 

I've always loved the plastic front piece/grill with it's great detail, that somehow show off the classic BMW headlights to great effect.  


The base of the car, like many of the other great bases of the Matchbox Int'l years, is packed with nice metal detail.   The Matchbox Int'l bases are truly the best bases of any Matchbox era!

So as with so many of these blog entries, I have to ask whether with such a great E32 casting, is there anything else that can compare to it?  


Hot Wheels made an attempt about 20 years ago, seen here.  And while the cars are reasonable, they offer no competition to the glorious Matchbox Int'l 323i casting.  
But there is a new (and very expensive) E32 casting in town - and that is the Hot Wheels RLC E32 M3.  The car was only available to Red Line Club members (hence "RLC"), and probably sold out immediately.  The only way to get it now (the way that I got one) is to buy it on EBay - and they aren't cheap.  I bought mine for about $50, but most go for $65-$75, which makes acquiring one a very expensive proposition.  But that money will buy you an absolute JEWEL of a car.  
This car is close to perfection, with exquisite detail, opening doors, and rubber tires.  But perhaps where it shines most is when you line it up with the Matchbox 323i, which suddenly feels HUGE in comparison.  It's not that the Hot Wheels is too small.  It's that the Matchbox is too BIG, at a massive 1:56 scale (as stamped on the bottom of the baseplate) vs. the 1:64 scale that Matchbox size cars are supposed to be.  
But, as nice as the RLC M3 is, it doesn't make me love the 323i casting any less.  It's still a favorite casting.  But maybe, just not quite AS favorite as the new RLC M3... 


Monday, January 16, 2023

Fixing my 2005 Aston Martin DB9 when no ignition left the car DEAD. Repair cost = $0!


4 years ago, I bought a dream car...

...Well, not my absolute DREAM car.  That would have been a FD Mazda RX7...  ...Or a Lotus Esprit Turbo S4...  ...or maybe an early '90s BMW 850i manual...  ...or even a late '60s Triumph GT6?

...Or if I was getting REALLY dreamy, maybe a late '80s Aston Martin V8 Vantage, or an early '90s Aston Martin Virage.  And as long as we are talking about big dollar cars, what about any number of Ferraris, from the crazy expensive ($2 MM?) mid-'80s GTO, to a comparatively bargain priced 348i?  

OK, so there are many contenders for my dream car, most of them from the late '80s or early '90s, when I was in my prime "dreaming" years.   

But nonetheless, the car I bought qualified as A dream car, even if it wasn't THE dream car.  An exquisitely beautiful shape, pulled like taffy to lengthen and lower it, and then pulled some more for good measure.  

A V12 engine, making more horsepower than ANY of the above mentioned dream cars.  

Hand-built, by a manufacturer with instant "exotic" car credentials.  

And best of all, arguably the MOST required criteria for any of my "dream" cars, a super-rare 6 speed manual transmission.  

A 2005 Aston Martin DB9 coupe.  Painted in a delicate shade of light green (I can't remember the formal name of the color right now), reminiscent of the Aston Martin Racing Green from their 1950s and 1960s LeMans race cars.  

And a price tag for a 14 year old used example that, while not low, was much lower than many other comparable cars - including most of the above dream cars.  

I was delighted with my purchase, but worried about the size of the repair bills that Aston Martin V12 exotic ownership would bring to me.  I tried to force down the thought of $10,000 and $20,000 repair bills for minor issues, and told myself that I, with my very-basic mechanic skills, would attempt the repairs myself.  

And so far, I've been successful!  The car has been mostly reliable, and although I've had to fix a number of minor items, I have yet to pay anyone to work on the car.  I've also been fortunate with the price of parts, since many of the mundane items in the car were taken from other less prestigious manufacturers (Ford, Volvo, Toyota, etc.), and so I've been able to source mostly inexpensive parts. 

But all of that good fortune seemed to evaporate last week when the car just wouldn't start.  

A basic tenet of cool-car-ownership is that a cool car is only cool when it actually runs and drives.  A broken-down car is useless, let alone exceedingly frustrating.  Even a crazy cool car like a 1957 Mercedes 300sl gullwing (or a V12 Aston with a manual gearbox) will lose its appeal quickly if it can't be driven.  So a non-running car is an issue.  And the thought of having it towed to an expensive foreign/exotic car mechanic is not a pleasant prospect. 

I had taken it out to do some shopping, and I noticed as I left the first store that the starter button (twist the key, push in the clutch, press the start button, yeah, it's a bit weird but its an Aston!) was suddenly finicky.  The car didn't immediately start, instead I had to push the button several times before the starter engaged and the car roared to life.  Leaving the second store the same thing happened.  But since the car ultimately started both times, I immediately forgot about it.  Until the next day, when I went to start the car in the garage, and NOTHING happened.  Like, nothing.  Not even a feeble attempt to turn over the engine.  And this time, it didn't "ultimately start".  The car was fully dead, but at least safe in my garage.  

I immediately came up with some potential scenarios, including the following 3 which I was able to quickly rule out:

1.  Something was wrong with my key (was there some sort of electronic sensor in my key that might have died?).  Easy test - I grabbed my other set of keys and tried starting it again, but again, nothing.  Not an issue with the key.  

2.  The battery was dead.  OK - this is of course the obvious issue - but the reason I listed it 2nd rather than 1st was that all my electronics in the car were working.  Radio, lights, dashboard lights, etc.  If there was enough power to power all that stuff, then the starter should have at least made an attempt to crank the engine.  I've owned the Aston long enough to have dealt with a dead (or somewhat dead) battery before, and I knew the sound that it would make when it had some power, just not enough to fully start the car.  But this time, when I turned the key to the on position, the dashboard all lit up, but then when I pressed the start button, there was nothing.  To fully rule out this issue, I charged up the battery overnight, but nothing changed.  It wasn't a dead battery issue.  

3.  BDS (Battery Disconnect Switch).  This again is a semi-obvious culprit - (I say "Semi' since it is only obvious if you KNOW about the BDS, which I only accidently learned about several years ago).  Here's the deal with BDS.  There is a mysterious button in the trunk (boot) of the car marked as "BDS", which you can push in order to disconnect most electrical items in the car and keep the battery from dis-charging during an extended absence.  This sounds intelligent, but it ISN'T.  Because for some incredibly stupid reason, the BDS switch in the trunk can only be used to ENGAGE the BDS, not to DISENGAGE the BDS.  In order to disengage the BDS, you have to worm your way into the back of the cabin and lift up the passenger rear seat cushion (which is NOT obvious that it is made to lift up - and requires quite a determined tug to do so) and find the re-engagement switch for the BDS.  To make matters even more illogical, the BDS switch turns off the ability to open the glove box, which is likely where your owner's manual is that TELLS you about the BDS.  So if you accidently engage the BDS, your car will be fully dead, and you won't be able to access the manual to learn about it.  Yes, I've been in that predicament, about 2 years ago.  Thank goodness for the internet!  ...But, fast forward to this particular issue, and although I considered whether I MIGHT have inadvertantly engaged the BDS, I also noticed that the glove box WAS able to be opened, and that the stereo WAS working, and thus, I ruled out BDS as the culprit.  

With the most obvious issues ruled out, I turned to the internet, and came up with my next 3 likely culprits:

4.  More major mechanical issue - like a bad starter, or perhaps a flywheel with a broken gear (it happened once to my Mom about 30 years ago on her Plymouth Voyager).  This category of issues would be expensive and hard for me to fix, so I figured I'd keep working on the less-involved issues first.  

5.  Bad starter button:  This one seemed like the most obvious candidate, since when I was out shopping, it had seemed like the button was futzy, and I'd needed to press it several times and in different ways in order to start the car.  Plus, based on my internet research, it was a known problem, and places like Scuderiacarparts.com (a good resource for Aston parts) sells replacement buttons.  I was almost to the point of ordering a new button, but first I wanted to check one last thing.  

6.  Bad clutch switch:  As I was researching the issue on the internet, someone mentioned that they had had a similar issue, and the Aston dealer had traced it to a broken wire in the clutch switch (remember that like most modern manual transmission cars, the clutch has to be pushed in for the car to start).  In reading about this issue, I found out that the starter button is supposed to glow red when the key was in the on position and the clutch was engaged (I'm embarrassed to admit that I hadn't fully noticed this before).  I couldn't remember whether the starter button had been first lit white and then red when the car had had the temperamental starting issues at the mall.  But I had to admit that when I was repeatedly pressing the starter button and it had finally started, I was also repeatedly pressing in the clutch, and thus the connection issue I was attributing to the starter button could also be with the clutch switch.  So I went to the garage again, turned the key, saw the starter button glow white, and then engaged the clutch, and the starter button DID NOT TURN RED.  Hmm.  So while I couldn't remember whether MY starter button typically turned red, it was reasonable to assume that it should be turning red, and the fact that it wasn't turning red might mean that it wasn't recognizing that the clutch was engaged.  

I hate working under the dashboard of a car.  You are lying on your back on the floor, with your bum trying to snake over the seat or out the door, and your forearms are invariably too long to bend at the right place to get both your arms above your face (why can't we have a 2nd elbow to make these maneuvers easier?), and it is always claustrophobic, and there is never enough light, and the stuff under the dashboard is always sharp such that your hands and wrists get all scraped, etc.  

But I crawled under there, and there was an obvious, and low down (easily accessible) component mounted by the clutch pedal with a plunger that engaged when the clutch was pressed.  It looked like the clutch switch.  But most importantly, there were 2 wires leading to the switch, and ONE OF THEM WAS BROKEN AND HANGING DISCONNECTED!!!    Bingo!  This was exciting - this seemed like the obvious culprit.  


However, the immediate problem was that the broken wire was broken right at the switch component, so I wasn't sure how I'd reconnect the wire.  I grasped the switch and started to play with it, and immediately realized that it turned, and by rotating it about 1/6th of a turn, the switch pulled out of it's mounting bracket, and now hung down slightly in front of the clutch pedal, which made it slightly easier to view (though still hard to reach which would make splicing the wires very difficult).  

I pulled at the wires (which went into a plastic cable sleeve) to try to get a bit more play in them, and noticed that the wiring sleeve was attached by a clip to another mounting point (the photo on the right has a black arrow pointing to it), and the clip easily slid off and disconnected, now allowing the wires and switch to hang a further 6 inches lower.  I also noticed that the switch itself (in green) was connected to the car wires by a black plug.  But it wasn't worth trying to disconnect the plug since the broken wire was broken on the car side of the plug.  But I still couldn't figure out how to reattach the loose wire since the broken-off wire was broken off RIGHT at the switch, with no exposed wire to strip.  I am always nervous about cutting wires, but I figured that at this point, the chance that this was my issue was very likely, so it was worth cutting them.  I saw that there was a fair amount of extra play in the wires, so if I lost 2 inches in total length they would still connect.   I pulled the wires out of the sleeve by about 6 inches, and snipped them both off, allowing me to bring the switch inside to a table (but ONLY after marking which of the wires went to the broken wire and which went to the non-broken wire!  This would be important later on!).  

Once inside I noticed a few more things:

1.  The plastic coating of the non-broken wire was actually broken as well, though not enough that the actual wires themselves had yet broken.  You can see it in the photos.  


2.  The green switch and the black plug disconnected quite easily.  There is a silver metal clip that pushes in and then the 2 easily separate.  

3.  Both the green switch and the black plug were marked as "Ford", with numbers on them that I guessed corresponded to part numbers.  I entered the green switch's number of "94BB-9C872-AC" into google, and immediately found lots of ones for sale, typically marked as being for brake pedal sensor switches for Ford Mondeos and Ford Focuses.  Unfortunately, none came with the plug.  

4.  The black plug had "97AG 144489 GBA" and "ES88A" and "PBT-GF30" on it, but very unfortunately, none of these 3 identifying numbers gave me any good hits on Google.  I looked and looked, trying various combinations of the numbers, inserting dashes for spaces, etc., but without any luck.  I called Scuderiacarparts.com, (who were selling the switch - but under a different part number), and they had no information about the plug that the switch required.  


I was really hoping to REPLACE the plug, vs. trying to hack into it and make a mess of the plug.   But without any means to find a new plug, I was left with no choice. I got out my dremel tool with a cutting wheel attached, and VERY CAREFULLY cut away about 1/2 an inch of the plastic housing of the plug on the side where the wire was broken.  That left me with about 1/3 an inch of the wire exposed, which I stripped, and then attached to the loose wire that I had trimmed off earlier.  I didn't have much confidence that the wires would hold, so I used my soldering iron and soldered them together, and then wrapped the connection with electrical tape.  Note - I work in finance - I'm not an electrical engineer.  I KNOW that this was an ugly soldering fix (and please do NOT show this post to my electrical engineer father!).  I also took the opportunity to wrap electrical tape around the exposed/frayed wires of the good connection.  


With my frankenstein-ian switch now hopefully repaired, I went back to the car, stripped off 1/2 an inch of plastic coating from each of the 4 cut ends of the wire (the 2 wires still connected to the car and the 2 wires connected to the switch), and lightly twisted them together.  Now was the moment of truth...  I put the key into the ignition and turned it to the on position, and used my thumb to depress the switch plunger...  ...AND THE STARTER BUTTON GLOWED RED!!!  

I hurredly now fully wire-nutted the connections, wrapped them in electrical tape, and re-installed switch (super easy) and re-clipped the switch's wire back onto its mounting clip, and again attempted to start the car.  This time, when the starter button glowed red, I pushed it, AND THE CAR ROARED TO LIFE!

So, that's how I repaired and was able to start my 2005 Aston Martin DB9, at a total cost of $0.  Yes, I'm feeling pretty proud of myself, and riding pretty high right now.  And yes, I'm guessing that this is a common issue.  The switch is mounted such that the wires for the connector are right against the firewall, where they will easily fray.  And I'm guessing that the guy who said that the Aston dealer found a broken wire issue IN his switch, probably the broken wire was really right BESIDE the switch, just beyond the switch connector, just like on my car.   

And I hope this repair synopsis might benefit someone, someday.  Yes, not many people repair their own Aston Martins, and not many are inclined to feel terribly bad for Aston Martin owners who have expensive car repair issues, but...  ...not all of us AM owners are trust fund babies, and some of us do fix our cars ourselves!   And good luck to any other Aston Martin owners out there who are having a similar issue!

Saturday, February 12, 2022

Thoughts and advice from 25 years of re-spraying diecast cars (along with a few pictures of some recent projects!)

Although I'm far from an expert on re-painting Matchbox and Hot Wheels cars, I've been doing it on an amateur basis for going on 25 years now, so I thought I'd share some of my advice about how to do it well, along with some photos of some recently sprayed cars.

The format of this blog-post will be some very basic advice (for someone who's never done this at all), followed by my more in-depth top 15 advice list.  

Basic Steps (that many readers will already know):

1.  Disassembly is a must:  Why?  Because even the steadiest hand and the finest brush won't allow you to brush paint right up to the windows, without getting it ON the windows.  You HAVE to take the windows out.  Plus, without taking the windows out, the inside metal of the car won't be painted, and will still be visible in the old color.  

We've all seen the gross flea market cars where some kid has attempted to change the color of the car, using some poster/tempura paint, with paint all over the windows, or WITHOUT paint in the new color going all the way up to the window.  So bite the bullet and realize that although disassembly is a pain, it makes everything MUCH easier...  

2.  How do you disassemble a car?  Easy (in concept), just drill out the rivets.  Most cars have 2 rivets on the bottom, one at the front and one at the back (though older Lesney cars sometimes have 2 rivets at the back, for a total of 3 (not including a potential rivet to hold the window glass in place)). 

Get a good and sharp set of drill bits, and start with the tiniest drill bit (this one will take the longest since you are getting the hole started) in the middle of the rivet, and go about 1/8th-1/16th of an inch deep.  Once the first pilot hole is done, just start moving up the drill bit sizes.  Most times you'll only need about 5-10 seconds of drilling as you move to a larger size - since the drill will immediately catch/bite using the original hole and expand the hold to the new size.  Do all 2-3 rivets for the car (or cars if you are doing multiple cars at the same time) before switching to the next largest drill bit.  Eventually you'll almost completely (90%?) drill out the rivet and suddenly the remains of the rivet will break, and the car will suddenly pop apart.  Once you have 1 rivet popped, you can start pulling apart the baseplate from the top of the car, and the other rivet(s) will quickly pop as well.  

Most cars have 4 main pieces - the diecast body (top), the baseplate (metal on old cars, plastic on new cars), an interior, and the plastic glass, plus the 2 axles with wheels.  Older cars may have more than 4 pieces (opening doors are individual pieces, sometimes there are multiple body pieces, or separate grills, etc.).  It'll all be pretty obvious once you get the car apart.  

On older cars (which are my favorites - and so also my favorites to respray) the glass is often held in place with another rivet on the underside of the roof.  For the glass rivet, I actually use a really large (wide) drill bit, since if I start with a tiny drill and try to make a pilot hole I'll actually drill right through the roof.  Instead I just try to remove enough of the expanded part of the rivot to allow the glass to pull away from the roof.  

3.  Paint ONLY using spray paint:  Again - this is a fairly hard and fast rule.  Don't try to brush paint a car - since you'll have lots of brush marks at the end, and the paint won't be smooth.  Spray painting is THE way to go to get a nice, smooth, professional looking finish (more on this later).  I've brush painted trim (headlights, taillights, sometimes grills, etc.) with moderate success.  But I've had very little success brush paining body panels (like doing a 2 tone paint job) since again the paint often dries with visible rough paint marks, and my hand is just not steady enough to make clean and straight lines with a brush.

The one exception to the brush painting advice is interior plastic...  In real life I really like brown leather car interiors, and so I often brush paint interiors in a tan or chestnut shade.   For some reason the plastic doesn't show up brush strokes.  Paint the interior a normal color (sometimes the casting will have a green or purple or sparkly interior which is entirely unrealistic and which NEEDS to be changed), and change black interiors (black absorbs light and hides detail) to a color that can actually be seen!

Top 15 advice list:

15.  Don't even start this project if you are not detail oriented/a perfectionist!  It's finicky, intricate, detail oriented stuff that you are doing.  If you aren't detail oriented, or don't really care about it, then it's just not worth doing.  Save yourself the time now!  But on the other hand if you are detail oriented and you love your diecast cars, then re-spraying them into a new car is a very do-able and satisfying project!

14.  The final project will be cool - but it's debatable HOW much you'll like it and if you will think that the time and expense were justified in the end.  If there is a color variation that already exists in the same color that you want to paint it in, then just go on EBay and buy that color variation.  It'll be much easier and cheaper (and more valuable)!  

13.  The final product will be valueless:   In general, code 3 (customized) cars are not worth anything besides their curiosity value.  So DON'T paint a high value nice condition car (it's a bad investment - plus it'll piss off other collectors who will think you ruined it!).  YOU are probably the only person who will truly appreciate the end-product!

12.  Be realistic about the time required:  Painting cars always takes longer (a LOT longer) than I expect.  This is not a one hour project!  

11.  (Related to #12 above)  Do more than one car at a time:  Doing multiple cars allows you to pick up some volume efficiencies from doing each of the various steps.  But don't do TOO many cars - or else you'll get overwhelmed, you'll get tired and start to rush, or it'll get too hard to remember which parts go with which car.  In my opinion about 4-5 cars is the optimal number to do at any one time.  

10.  (Related to #12 above...)  Patience is key.  Don't rush, take your time.  It's ok to redo a step.  

9.  Choose your projects carefully:  Only do cars/castings that you really like.  If you don't like the casting design BEFORE you paint it, you won't like it that much more AFTER you paint it.  And if you don't like it, you won't be inspired to really put the time and energy and patience into making the final project look terrific.

Also consider the condition of the cars that you are doing.  While scratched window glass can be mostly repaired (dip the glass into a container of MopandGlo and let it dry - the MopandGlo will fill in the scratches amazingly), I've never figured out how to repair/unbend axles (though there are plenty of guys out there who CAN do this), and I've never figured out a good way to repaint wheels without having the new paint look all blobby.  So either be OK with the faded wheel paint, or replace them with new wheels from other donor cars (easier said than done - since the wheels and axles need to be the same size and width or they won't work!).  

In summary - do cars that are in poor enough condition that you don't feel bad about ruining their originality, but in good enough condition that the unrestored parts of them won't detract from the new paint

8.  Spray painting cars is both incredibly easy... ...but can also be surprisingly tough.  Do smooth passes, a few inches away from the car.  I put the car on a painting block that I made on 8 inch lengths of 2 inch wide pine boards, sitting on nails pounded into the board (to keep the bottom lip of the body from touching the block), which allows me to turn the block for different passes from different angles.  Do the passes slow enough that you get good paint coverage, but not so slow that the paint collects on it and starts to drip/run.  You DON'T want thick paint - it'll dry funny - and it obscures all the great Lesney detail that made you like the car in the first place!  If you get the paint on too thick, just wipe it off with paint thinner (a NECESSARY item to have for this project) and respray it.  Allow the paint to slightly dry (10-20 minutes) between coats.  Allow the paint to dry much more (several hours) before handling the casting AT ALL , or before turning the casting upside down to do the inside and bottom (as well as getting a different angle on the outside of the casting).  In the unlikely scenario that the paint is NOT covering and you keep on adding more coats and it continues to not cover - it's probably too wet and is running.  Let it dry (or if already too drippy - wipe it off and start over).  

7.  Choose your paint carefully.  Get several different colors and types of paints.  Some paints work great - others don't - even if they are from the same brand/type of paints.  

Choose your colors carefully as well.  Some colors look great - others just don't.  About 10-20% of the time I'll spray a car and then think that I just don't like the way the color looks - it's too dark, or too muted, or too crazy and unrealistic, or just wrong somehow, and I'll wipe it off and redo it in a different color.  

I've had REALLY good luck with metallic colors - bronzes, coppers, silvers, etc.  You'll see several of these colors in the photos of the recently done cars.  In fact, that bronze color on the Lesney Mercury sedan and Scania tractor is my FAVORITE paint color ever - I've probably done 10+ cars in that paint color (and it's a big standard sized Rustoleum spray paint can available for $5 from any WalMart/Home Depot).  When I first started spraying cars I used the little 4 inch Testor cans available from hobby Shops - but I'm not convinced that those Testor cans are any better than standard (and much cheaper on a per ounce basis) Rustoleum cans (though the Testor cans DO come in a wider variety of colors!).  

When choosing a color - think about how realistic it will be.  Most real cars are painted white, black, silver or red.  Unfortunately, I haven't had great luck with the particular white or red shades that I've tried so far.  And I don't like black since it hides rather than shows detail.  Painting a luxury car a wild shade of purple or lime green is going to look a bit odd, though those can be great colors for muscle cars.   

6.   You don't need to strip all the paint from the old casting, but consider sanding it a bit to hide any existing paint chips:  Using paint stripper is messy, gross, environmentally unfriendly and it adds a lot of time to the process.  Most spray paints will provide excellent color coverage, and you won't see the old paint once the new paint is on.  However, if the old paint was significantly chipped, you MAY see the outline of the chips clearly visible in the new paint.  Therefore while I've stopped stripping the castings, I DO use a Dremel tool with a wire brush wheel attached to quickly sand/smooth the old paint and smooth down any chips. I don't worry about getting every speck of the old paint off unless it is really thick and blobby, or if it is so thick that it hides important metal detail in the casting.

5.  Have fun and consider additional customizations while you've got the car apart.  There are lots of customizations that are possible to do to a car besides just painting it.  The Mercury sedan in the foreground of the right-hand photo only came in a police/fire car, with an emergency police/fire light (in various shapes) on the roof.  So before I painted this car, I first ground down the lip surrounding the light (with a dremel tool), then I filled in the light hole with metal solder.  While the final result isn't perfect (you can see that the roof isn't perfectly smooth), I'm still pretty happy with it, and I now have a normal (non-Police/Fire) sedan that was never actually made by Lesney!  

Other customizations that I've done include:  1.  Cutting the roof off and making a convertible (cutting the roof off is easy with a Dremel cutting blade, but reforming the back deck into the shape of a convertible top can be pretty difficult), 2.  doing base plate swaps with other versions of the same casting, 3.  changing wheels, 4.  eliminating or adding huge off-road wheels (be warned that this can be pretty hard, etc.  

4.  Be VERY careful of fingerprints:  Avoid any serious handling of the car until the paint has had a chance to harden (overnight is best).   If not, when you pressing the hood/trunk/roof of the car to re-mate it to the baseplate - you'll transfer your fingerprints into the paint.  Seriously.  Learn from my mistakes - I've done this mistake WAY too many times!  

3.  The paint on repainted castings is VERY fragile:  For some reasons, it chips really easily.  I estimate that a repainted car will chip about 10 times easier than original paint.  I've chipped repainted cars just placing them back into cases!  I don't know why this is - I've tried adding primer and clear coat and they don't seem to make much of a difference (but feel free to experiment yourself!)

2.  Skip the primer and clear coat: Although you'd think that primer and clear coat would provide more protection and more durability, I'm frankly not convinced.  They add additional painting time (and more importantly - drying time).  Primer adds the possibility of being sprayed on too thickly and obscuring detail.  And clear coat can change the color of a lighter paint shade.  At this point, I just don't feel that their benefits offset their disadvantages - but I'll keep on experimenting and maybe I'll change my mind again!

1.  Use superglue to put the whole thing back together:  Serious restorers tap new screws and screw the body back together.  But I've never figured out how to do this - and frankly - superglue is a lot easier! 

Finally, enjoy your new and unique look!

Monday, February 7, 2022

The clash of the pizza vans


The term "Pizza Van" instantly conjures up just 1 image for me.

It was one of the most iconic cars from when I was a kid (and a car I didn't have!).  For several years, the VW Transporter (Dormobile) pizza van was advertised on the back of Matchbox blisterpacks as the prize for joining the Matchbox collectors club...

So I was very pleased when I finally found and acquired this example 30 years later (regardless of how it smelled of stale cigarette smoke).  But upon closer inspection, it's not actually THAT great of a casting, with no interior (hidden by opaque green windows), no suspension, no opening parts, and overly wide (and thus very inset) tire/wheels.  Regardless, it's THE iconic pizza van in my mind.  

But now there's a challenger!  Tomica's new Hi-Ace van, a nice model (though sadly no longer with any opening parts) is now available in the same color combination (Italian flag colors) pizza van livery! ...which means it's time for a showdown...   a comparison test...   the classic tale of champion vs. challenger!


But if you've been paying attention to the words I've been writing, then you probably already have a pretty clear idea of how this will end.... ...which is an easy win for the Tomica. Yes, the Lesney is iconic, and vintage, and has pretty reasonable detail and nice paint (though the Tomica has equivalently nice detail and paint), but it's no match for the Tomica's silky soft suspension, the classic boxy design, and the seperate glass/plastic headlights!  

We have a new pizza van winner!