Total Pageviews

Showing posts with label Matchbox. Show all posts

Sunday, July 21, 2024

Who makes the best of the Mercedes 560 SEC / 500 SEC - the coolest, most bad-ass car of the late 1980s - the “I’m a Miami drug kingpin, this is my car - don’t mess with me!!!”?

For 35 years I've thought the Mercedes Benz 560 SEC, especially in modified AMG form, was one of the coolest, most-intimidating looking cars on the road.  The SEC was already the best looking, most expensive, most powerful coupe on the road in the late 1980s (with only the exotic Aston Vantage having any ability to challenge it).  And the AMG version of the SEC doubled the SEC’s already crazy price, adding power, presence and speed in equal measure.  The resulting car made even a Lamborghini Countach look like a bratty pouser, with more presence than almost anything else on the road!


And the Matchbox model (technically of the rest-of-the-world 500 SEC) did a great job of capturing that essence - a big meaty bruiser of a luxury coupe - making it one of my favorite castings of the post-lesney era - and a frequent subject of this blog.  I've got it in many colors - though there still remain a number of variations that I DON'T have it in.  

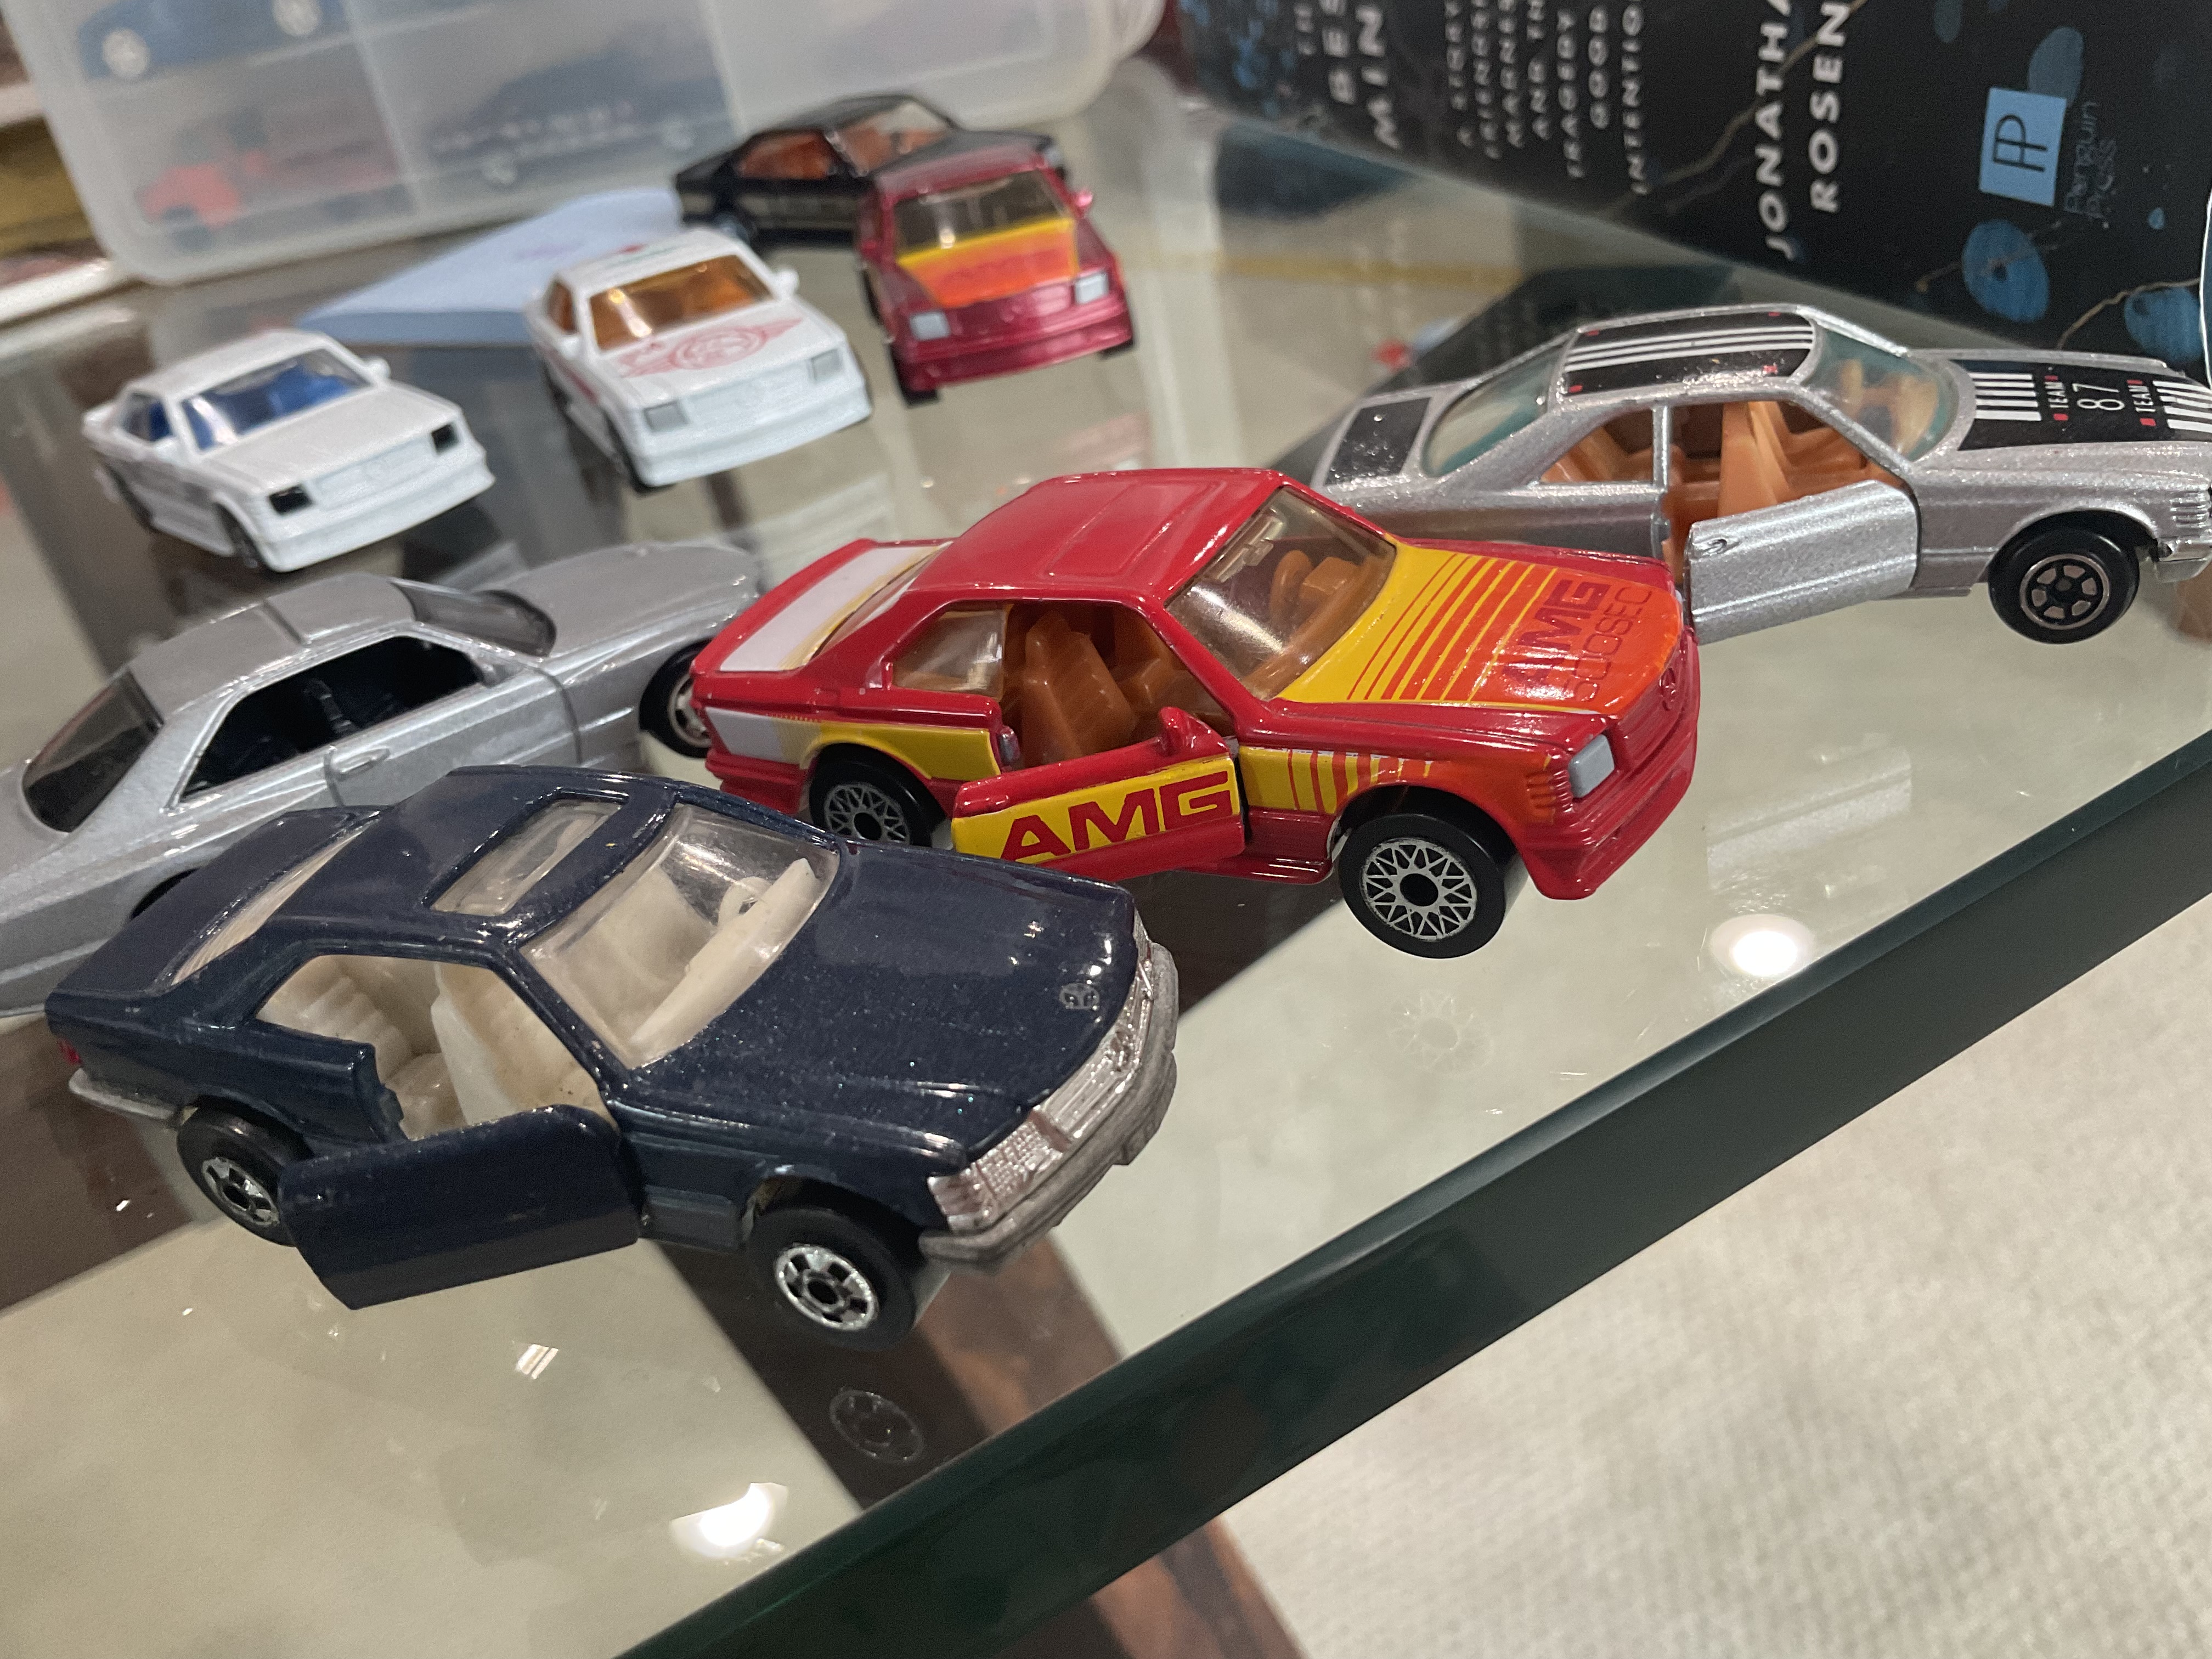
But recently, Hot Wheels introduced its own basic series casting of the same car - and it’s a phenomenal casting - easily my favorite Hot Wheels basic casting of the last few years.  I've found it in black, red, and grey/silver.  As cool as the vintage Matchbox is, this new Hot Wheels casting had something about it that was different than the Matchbox - with more sculpted rear wheel arches - slightly more streamlined and proportional bodywork, with the gotta-play-with-it essence that makes for a great diecast model.  I couldn’t help feeling like this HAD to result in a throw down comparison test.  

But THEN….  …I found a vintage Road Champs model of the 500SEC, in a rich shade of dark blue, with opening doors and a metal base!  A great car and a great find… ...and as long as I was including THAT one, I felt I had to also include Yatming's version of the 500SEC, particularly since it was one of Yatming’s stronger models, again with opening doors and metal base.  I have 2 of that casting in identical silver paint.  

All of which sets up for a compelling comparison test!

While all 4 castings are undeniably cool on their own, all great models, all faithfully replicating the coolness of the authentic SEC, all with certain advantages…. …still not all of the 4 castings compete at the same level.  In any competition there are winners and non-winners, and that is certainly the case here.

As much as I root for the underdog, and like the early high-quality Yatming castings, the Yatming is unquestionably the laggard of the group - it makes for an easy-to-determine 4th place finish.   It’s still a great casting, with a real metal base, a separate insert for the front grill/bumper/headlights (though that insert looks a little cheaply/plasticky), good detail, a soft suspension, opening doors, cream-colored interior, etc., etc., etc.  On its own, it’s great, but in comparison to the others, it just doesn’t look as tough as the others.  The Matchbox and Hot Wheels are models of the AMG modified SEC, whereas the Yatming and the Road Champs are models of the normal (still very nice!) Mercedes, and the difference is evident.  It just looks less muscular than the Matchbox and Hot Wheels…. …and it relegates the Yatming to a (strong) last place.

The next casting that gets eliminated is the Road Champs, really for the same reason as the Yatming.  It’s essentially a nicer version of the Yatming, a better model of the normal SEC rather than the ultra-tough AMG monster SEC.  …But the regular SEC still oozed class, more class than anything on the road aside from a Bentley Turbo R, and here the Road Champs finds its niche.  It beats the nice Yatming in almost every category (save for perhaps the silkiness of its suspension).  It’s bigger, meatier, with richer classy dark blue paint, a more substantial baseplate, a metal insert for the front clip that drips with detail (down to the headlight windshield wipers!), a cast-in-metal 3-pointed star on the hood, a glass sunroof, etc. etc. etc.  This is a Great model!  …but just not as great as the next 2 models.  I love it - but not enough to move it beyond 3rd place. 


If the voting was hard earlier, it gets even harder at this point…. Both the original Matchbox and the new Hot Wheels are REALLY nice competitors.  The Matchbox has a silky soft suspension, a heavy feel, great metal detail, and opening doors.  But it has its own downfalls - chief of which is that it looks a little fat and tall, especially when viewed against the more accurately proportionately modeled Hot Wheels.  Plus, the Hot Wheels colors are just on fire.  In addition, the detail on the Hot Wheels is over the top, with a vented-open sunroof (a first-ever in a diecast car?), speaker cutouts on the interior rear shelf, the best dual-exhaust of the bunch, modern-era paint detail for the front and especially rear lights, etc.

And so the new Hot Wheels casting wins - even without opening doors - and against one of my all-time favorite Matchbox cars, and against amazing contenders from Yatming and Road Champs.  That being said, (and I know I say this all the time!), all 4 models are phenemonal castings, there’s not a true loser in the bunch.  All 4 competitors are truly worthy adversaries!  

I’ve got to SAY, what a TOY!


Saturday, July 20, 2024

Cool Green Livestock Tractor Trailers from Diecast stalwarts Matchbox and Majorette! (and a surprise additional rig is included at the end of the blog post!)

I remember loving it as a kid in the early 1980s when Matchbox came out with their "Convoy" series of tractor trailers, with cool sleeper cab tractors and interchangeable trailers.  And this particular convoy set is one of the best!

It features a handsome Kenworth Aerodyne Tractor in showy green paint.  And it comes with a matching livestock trailer, with dropping side and rear tailgate doors to let the animals in and out, making for a different trailer than the normal run-of-the-mill box trailers that typically come with the convoy sets.  

The only real let-down for this set is that the trailer is built off of Matchbox's standard short lowboy flatbed trailer - but at first its hard to even understand why that is a letdown...

Ah - so here's the rub...  As you'd expect from one of my blog posts, I'm writing this post because we have another vintage offering - a similar Kenworth pulled livestock tractor trailer contender from Majorette - in almost the exact same color scheme as the Matchbox!  Time for a comparison test!  Which of the 1980s diecast heavyweights made the best livestock tractor trailer?!?  

Normally, I'd be the first to rate Matchbox tractor trailers as better than Majorette tractor trailers.  But after looking at this particular unit, I wondered why I was so quick to form that opinion.  It too features a Kenworth sleeper cab in green - this time with opening hood! - and mag wheels that are more unique than the cool looking (albeit common) ones on the Matchbox.  And the trailer seems like a solid contender as well - again with dropping livestock ramps on the side and back.  

Lining them up against each other, 2 things jump out:

1.  The color - The Matchbox is just a richer, more pleasing shade of green vs. the Majorette
2.  The length - the Majorette is a solid inch plus longer than the Matchbox - and makes the Matchbox look too short (a victim of the usage of the standard low-boy trailer).  In the past I've sometimes reflected on how Matchbox convoys seem slightly too short - in comparison to the Majorette - this critique seems much more magnified.  
And in the end, this 2nd critique ended up being the more important critique in this comparison test.  

Because I really like both tractor trailers.  The Matchbox rigs have always been favorites for me - and this one - especially with its sharp green paint and very unique trailer - is one of the best.  And I've always been partial to the custom look of the Kenworth cab with its extended height sleeper and skylights. 

But the Majorette is also super unique (and hard to find!) and handsome.  The opening hood is a plus, though not a huge plus.  But the length... ...the longer length just makes the Majorette seem more correct.  And in the end - this was enough to sway the scale just enough to make the Majorette the winner.  

At least, the winner until another contender rears its head...  ...read on to the end of the article for a surprise additional consideration!


So - the suspenseful part of the article - the additional contender - is a larger scale rig from Majorette - a slightly older piece with a 1970s cab - but a show-horse livestock trailer that incorporates a camper!  

Including this rig into the comparison test isn't at all fair - since the scales are all different.  But as another legitimate livestock trailer - and a super cool casting - I felt that I had to show it also...  

Overall, all 3 rigs are very nice - some of the nicest available.  Among the traditional Matchbox sized pieces - both contenders are really nice - but I give the advantage to the Majorette.  And the larger scale red Majorette is as cool of a piece as you'll ever find.  Get all 3 if you can!


Sunday, March 31, 2024

The Tootsie-Toy model that (almost!) beats out a cool, antique Lesney Matchbox casting - a stalwart model of any Lesney aficionado's collection!

Who would ever think that a Tootsie-toy could ever compete with a Matchbox car?

Tootsie-toys were cheapy - without interiors - without glass - without suspensions...  ...cheap drugstore 5-packs of cars that uncles and aunts would give you to fill out your collection - with their undiscerning eyes failing to grasp how much of a throw-away toy they just got you...

So imagine my surprise when I found an antique fuel tanker in a hobby store, with a solid heft to the model, and turned it over to read "Tootsie Toy" on the bottom!

I lined it up with the red Matchbox Major-pack No 8 fuel tanker ("Thornycroft Tractor" and "Thornycroft 2400 Gallon Trailer Tanker") and the resemblances were astonishing.  The colors matched almost exactly.  Both were labeled as "Mobil".  The sizes were almost dead even - the Tootsie-toy is slightly longer only due to the nose of the conventional tractor vs. the cab-over design of the Lesney Matchbox.  Neither had window glass (window glass would not become a common item in Matchbox cars for another 5-10 years) nor suspensions (not common until the advent of Hot Wheels cars 10-15 years later).  In short, the 2 were true competitors in almost every way.  Sounds like a recipe for a "Matchbox Frenzy" comparison test!

But once we get to an actual comparison, it becomes clear - the Lesney Matchbox is obviously the nicer and higher quality model.  The level of trim detail is just greater (by quite a margin).  The wheels are higher quality.  The tractor has a base plate to it.  The trailer hitch is less stone-age.  

So what is it about the Tootsie Toy that got me so excited?  Well, mostly its the heft of the trailer.  It feels like its carved from a solid block of metal - as if there is no empty space inside of the trailer.  The heft of it is truly amazing - it is obviously heavier than the Matchbox.  

While the detail can't compare to the Matchbox (the Tootsie-toy comes off as somewhat crude in a direct head-to-head comparison), on its own it appears nicely detailed - especially for a Tootsie Toy!  And then there is the size comparison - which is dead on equivalent in scale proportions.  This is indeed a Tootsie-Toy that directly competes with a classic stalwart of the Lesney Matchbox line.  And that's really where my surprise and astonishment came from.  

So chalk this one up as the one Tootsie-toy that every true Lesney Collector should have in their collection - the only Tootsie-Toy that I've yet found that truly deserves to have a place alongside other classic Lesney models!

P.S.  If you are a Stephen King fan, you might be familiar with his first film "the Duel" - a short movie about a psycho in a fuel tanker truck terrorising a salesman out on the road.  If either of these trucks were black instead of red - they'd almost be candidates for the duel's tanker truck!

Tuesday, January 24, 2023

All else being equal, are mint condition cars always preferable to non-mint condition cars? Answer: NO!

This sounds obvious, but...:

...Aren't mint condition cars ALWAYS preferable to non-mint cars?  No!

You see it all the time in die-cast car forums, where they will describe a reasonable but non-mint car as a "filler", a temporary place-holder until you can find a mint-condition example of that casting.  As if to say, that the only purpose of a non-mint car is to be a place-holder until you find the "better" mint example.  

Which begs the question, are there ANY instances where, all else being equal (color, variation status, wheels, etc.), you'd actually prefer a non-mint car over a mint car?  

...And my answer to that is a resounding YES! 

Now, to be clear, this IS the exception rather than the norm.  For the most part, better condition cars are almost always preferable over worse condition cars.  And broken cars are ALWAYS less desirable than non-broken cars.  But...  ...there are situations where I actually prefer the non-mint car over the mint car.  

Some of it comes from the sense of sentimentality, that the specific non-mint model in question may hold sentimental feelings for you, that you remember playing with that SPECIFIC model as a kid, and the mint model just can't compete.  

But some of it also comes from the fact that to my eyes, the mint models are sometimes TOO shiny.  And the non-mint but good condition model may somehow look more like an ordinary car on the street, with a little less shine, and few more scuffs.  This is particularly the case for cars that are SUPPOSED to have scuffs - for instance pick-up trucks - or rally cars - rather than Rolls Royce's or Cadillacs.

I instantly thought of 2 real-life examples.  And they are from 2 of my all-time favorite Matchbox castings - the Mercedes AMG 500 SEC, and the Red Transitional Superfast Ford Pick-up.  In both cases I compared highly beat-up examples (left-most), with mint examples (right-most), and with good "filler" examples (center).  

And in both cases, I found that the played-with-good condition examples just had something about them that the mint examples lacked - some sense of old-car realism (particularly relevant for an old pick-up truck) combined with a unique "come-play-with-me" siren call.  

To be clear, it doesn't hurt that both of these middle examples also have that sentimentality going for them.  In both cases, these specific examples were the actual first examples of these castings that I ever had.  In the case of the 500SEC, it was a casting that I had desired as a kid but didn't actually get until a decade later as an adult collector.  And in the case of the pick-up, this was a casting that I literally had never before seen, until the day that I pulled that actual truck out of a $.50 bargain bin at a Matchbox collector flea market, marveling that such a great casting even existed.  But I don't think that sentimentality is the only thing going for them, instead I think that I would prefer them even without that sentimentality.  
 

So what do you think?  Am I completely off-base?  Or is there something about the playwear that is magical - some sense of "Velveteen-Rabbit"-esque toy-magic - gradually imbued on them by countless hours of childhood play?  

Saturday, February 12, 2022

Thoughts and advice from 25 years of re-spraying diecast cars (along with a few pictures of some recent projects!)

Although I'm far from an expert on re-painting Matchbox and Hot Wheels cars, I've been doing it on an amateur basis for going on 25 years now, so I thought I'd share some of my advice about how to do it well, along with some photos of some recently sprayed cars.

The format of this blog-post will be some very basic advice (for someone who's never done this at all), followed by my more in-depth top 15 advice list.  

Basic Steps (that many readers will already know):

1.  Disassembly is a must:  Why?  Because even the steadiest hand and the finest brush won't allow you to brush paint right up to the windows, without getting it ON the windows.  You HAVE to take the windows out.  Plus, without taking the windows out, the inside metal of the car won't be painted, and will still be visible in the old color.  

We've all seen the gross flea market cars where some kid has attempted to change the color of the car, using some poster/tempura paint, with paint all over the windows, or WITHOUT paint in the new color going all the way up to the window.  So bite the bullet and realize that although disassembly is a pain, it makes everything MUCH easier...  

2.  How do you disassemble a car?  Easy (in concept), just drill out the rivets.  Most cars have 2 rivets on the bottom, one at the front and one at the back (though older Lesney cars sometimes have 2 rivets at the back, for a total of 3 (not including a potential rivet to hold the window glass in place)). 

Get a good and sharp set of drill bits, and start with the tiniest drill bit (this one will take the longest since you are getting the hole started) in the middle of the rivet, and go about 1/8th-1/16th of an inch deep.  Once the first pilot hole is done, just start moving up the drill bit sizes.  Most times you'll only need about 5-10 seconds of drilling as you move to a larger size - since the drill will immediately catch/bite using the original hole and expand the hold to the new size.  Do all 2-3 rivets for the car (or cars if you are doing multiple cars at the same time) before switching to the next largest drill bit.  Eventually you'll almost completely (90%?) drill out the rivet and suddenly the remains of the rivet will break, and the car will suddenly pop apart.  Once you have 1 rivet popped, you can start pulling apart the baseplate from the top of the car, and the other rivet(s) will quickly pop as well.  

Most cars have 4 main pieces - the diecast body (top), the baseplate (metal on old cars, plastic on new cars), an interior, and the plastic glass, plus the 2 axles with wheels.  Older cars may have more than 4 pieces (opening doors are individual pieces, sometimes there are multiple body pieces, or separate grills, etc.).  It'll all be pretty obvious once you get the car apart.  

On older cars (which are my favorites - and so also my favorites to respray) the glass is often held in place with another rivet on the underside of the roof.  For the glass rivet, I actually use a really large (wide) drill bit, since if I start with a tiny drill and try to make a pilot hole I'll actually drill right through the roof.  Instead I just try to remove enough of the expanded part of the rivot to allow the glass to pull away from the roof.  

3.  Paint ONLY using spray paint:  Again - this is a fairly hard and fast rule.  Don't try to brush paint a car - since you'll have lots of brush marks at the end, and the paint won't be smooth.  Spray painting is THE way to go to get a nice, smooth, professional looking finish (more on this later).  I've brush painted trim (headlights, taillights, sometimes grills, etc.) with moderate success.  But I've had very little success brush paining body panels (like doing a 2 tone paint job) since again the paint often dries with visible rough paint marks, and my hand is just not steady enough to make clean and straight lines with a brush.

The one exception to the brush painting advice is interior plastic...  In real life I really like brown leather car interiors, and so I often brush paint interiors in a tan or chestnut shade.   For some reason the plastic doesn't show up brush strokes.  Paint the interior a normal color (sometimes the casting will have a green or purple or sparkly interior which is entirely unrealistic and which NEEDS to be changed), and change black interiors (black absorbs light and hides detail) to a color that can actually be seen!

Top 15 advice list:

15.  Don't even start this project if you are not detail oriented/a perfectionist!  It's finicky, intricate, detail oriented stuff that you are doing.  If you aren't detail oriented, or don't really care about it, then it's just not worth doing.  Save yourself the time now!  But on the other hand if you are detail oriented and you love your diecast cars, then re-spraying them into a new car is a very do-able and satisfying project!

14.  The final project will be cool - but it's debatable HOW much you'll like it and if you will think that the time and expense were justified in the end.  If there is a color variation that already exists in the same color that you want to paint it in, then just go on EBay and buy that color variation.  It'll be much easier and cheaper (and more valuable)!  

13.  The final product will be valueless:   In general, code 3 (customized) cars are not worth anything besides their curiosity value.  So DON'T paint a high value nice condition car (it's a bad investment - plus it'll piss off other collectors who will think you ruined it!).  YOU are probably the only person who will truly appreciate the end-product!

12.  Be realistic about the time required:  Painting cars always takes longer (a LOT longer) than I expect.  This is not a one hour project!  

11.  (Related to #12 above)  Do more than one car at a time:  Doing multiple cars allows you to pick up some volume efficiencies from doing each of the various steps.  But don't do TOO many cars - or else you'll get overwhelmed, you'll get tired and start to rush, or it'll get too hard to remember which parts go with which car.  In my opinion about 4-5 cars is the optimal number to do at any one time.  

10.  (Related to #12 above...)  Patience is key.  Don't rush, take your time.  It's ok to redo a step.  

9.  Choose your projects carefully:  Only do cars/castings that you really like.  If you don't like the casting design BEFORE you paint it, you won't like it that much more AFTER you paint it.  And if you don't like it, you won't be inspired to really put the time and energy and patience into making the final project look terrific.

Also consider the condition of the cars that you are doing.  While scratched window glass can be mostly repaired (dip the glass into a container of MopandGlo and let it dry - the MopandGlo will fill in the scratches amazingly), I've never figured out how to repair/unbend axles (though there are plenty of guys out there who CAN do this), and I've never figured out a good way to repaint wheels without having the new paint look all blobby.  So either be OK with the faded wheel paint, or replace them with new wheels from other donor cars (easier said than done - since the wheels and axles need to be the same size and width or they won't work!).  

In summary - do cars that are in poor enough condition that you don't feel bad about ruining their originality, but in good enough condition that the unrestored parts of them won't detract from the new paint

8.  Spray painting cars is both incredibly easy... ...but can also be surprisingly tough.  Do smooth passes, a few inches away from the car.  I put the car on a painting block that I made on 8 inch lengths of 2 inch wide pine boards, sitting on nails pounded into the board (to keep the bottom lip of the body from touching the block), which allows me to turn the block for different passes from different angles.  Do the passes slow enough that you get good paint coverage, but not so slow that the paint collects on it and starts to drip/run.  You DON'T want thick paint - it'll dry funny - and it obscures all the great Lesney detail that made you like the car in the first place!  If you get the paint on too thick, just wipe it off with paint thinner (a NECESSARY item to have for this project) and respray it.  Allow the paint to slightly dry (10-20 minutes) between coats.  Allow the paint to dry much more (several hours) before handling the casting AT ALL , or before turning the casting upside down to do the inside and bottom (as well as getting a different angle on the outside of the casting).  In the unlikely scenario that the paint is NOT covering and you keep on adding more coats and it continues to not cover - it's probably too wet and is running.  Let it dry (or if already too drippy - wipe it off and start over).  

7.  Choose your paint carefully.  Get several different colors and types of paints.  Some paints work great - others don't - even if they are from the same brand/type of paints.  

Choose your colors carefully as well.  Some colors look great - others just don't.  About 10-20% of the time I'll spray a car and then think that I just don't like the way the color looks - it's too dark, or too muted, or too crazy and unrealistic, or just wrong somehow, and I'll wipe it off and redo it in a different color.  

I've had REALLY good luck with metallic colors - bronzes, coppers, silvers, etc.  You'll see several of these colors in the photos of the recently done cars.  In fact, that bronze color on the Lesney Mercury sedan and Scania tractor is my FAVORITE paint color ever - I've probably done 10+ cars in that paint color (and it's a big standard sized Rustoleum spray paint can available for $5 from any WalMart/Home Depot).  When I first started spraying cars I used the little 4 inch Testor cans available from hobby Shops - but I'm not convinced that those Testor cans are any better than standard (and much cheaper on a per ounce basis) Rustoleum cans (though the Testor cans DO come in a wider variety of colors!).  

When choosing a color - think about how realistic it will be.  Most real cars are painted white, black, silver or red.  Unfortunately, I haven't had great luck with the particular white or red shades that I've tried so far.  And I don't like black since it hides rather than shows detail.  Painting a luxury car a wild shade of purple or lime green is going to look a bit odd, though those can be great colors for muscle cars.   

6.   You don't need to strip all the paint from the old casting, but consider sanding it a bit to hide any existing paint chips:  Using paint stripper is messy, gross, environmentally unfriendly and it adds a lot of time to the process.  Most spray paints will provide excellent color coverage, and you won't see the old paint once the new paint is on.  However, if the old paint was significantly chipped, you MAY see the outline of the chips clearly visible in the new paint.  Therefore while I've stopped stripping the castings, I DO use a Dremel tool with a wire brush wheel attached to quickly sand/smooth the old paint and smooth down any chips. I don't worry about getting every speck of the old paint off unless it is really thick and blobby, or if it is so thick that it hides important metal detail in the casting.

5.  Have fun and consider additional customizations while you've got the car apart.  There are lots of customizations that are possible to do to a car besides just painting it.  The Mercury sedan in the foreground of the right-hand photo only came in a police/fire car, with an emergency police/fire light (in various shapes) on the roof.  So before I painted this car, I first ground down the lip surrounding the light (with a dremel tool), then I filled in the light hole with metal solder.  While the final result isn't perfect (you can see that the roof isn't perfectly smooth), I'm still pretty happy with it, and I now have a normal (non-Police/Fire) sedan that was never actually made by Lesney!  

Other customizations that I've done include:  1.  Cutting the roof off and making a convertible (cutting the roof off is easy with a Dremel cutting blade, but reforming the back deck into the shape of a convertible top can be pretty difficult), 2.  doing base plate swaps with other versions of the same casting, 3.  changing wheels, 4.  eliminating or adding huge off-road wheels (be warned that this can be pretty hard, etc.  

4.  Be VERY careful of fingerprints:  Avoid any serious handling of the car until the paint has had a chance to harden (overnight is best).   If not, when you pressing the hood/trunk/roof of the car to re-mate it to the baseplate - you'll transfer your fingerprints into the paint.  Seriously.  Learn from my mistakes - I've done this mistake WAY too many times!  

3.  The paint on repainted castings is VERY fragile:  For some reasons, it chips really easily.  I estimate that a repainted car will chip about 10 times easier than original paint.  I've chipped repainted cars just placing them back into cases!  I don't know why this is - I've tried adding primer and clear coat and they don't seem to make much of a difference (but feel free to experiment yourself!)

2.  Skip the primer and clear coat: Although you'd think that primer and clear coat would provide more protection and more durability, I'm frankly not convinced.  They add additional painting time (and more importantly - drying time).  Primer adds the possibility of being sprayed on too thickly and obscuring detail.  And clear coat can change the color of a lighter paint shade.  At this point, I just don't feel that their benefits offset their disadvantages - but I'll keep on experimenting and maybe I'll change my mind again!

1.  Use superglue to put the whole thing back together:  Serious restorers tap new screws and screw the body back together.  But I've never figured out how to do this - and frankly - superglue is a lot easier! 

Finally, enjoy your new and unique look!