Total Pageviews

Showing posts with label code 3. Show all posts

Saturday, February 12, 2022

Thoughts and advice from 25 years of re-spraying diecast cars (along with a few pictures of some recent projects!)

Although I'm far from an expert on re-painting Matchbox and Hot Wheels cars, I've been doing it on an amateur basis for going on 25 years now, so I thought I'd share some of my advice about how to do it well, along with some photos of some recently sprayed cars.

The format of this blog-post will be some very basic advice (for someone who's never done this at all), followed by my more in-depth top 15 advice list.  

Basic Steps (that many readers will already know):

1.  Disassembly is a must:  Why?  Because even the steadiest hand and the finest brush won't allow you to brush paint right up to the windows, without getting it ON the windows.  You HAVE to take the windows out.  Plus, without taking the windows out, the inside metal of the car won't be painted, and will still be visible in the old color.  

We've all seen the gross flea market cars where some kid has attempted to change the color of the car, using some poster/tempura paint, with paint all over the windows, or WITHOUT paint in the new color going all the way up to the window.  So bite the bullet and realize that although disassembly is a pain, it makes everything MUCH easier...  
2.  How do you disassemble a car?  Easy (in concept), just drill out the rivets.  Most cars have 2 rivets on the bottom, one at the front and one at the back (though older Lesney cars sometimes have 2 rivets at the back, for a total of 3 (not including a potential rivet to hold the window glass in place)). 

Get a good and sharp set of drill bits, and start with the tiniest drill bit (this one will take the longest since you are getting the hole started) in the middle of the rivet, and go about 1/8th-1/16th of an inch deep.  Once the first pilot hole is done, just start moving up the drill bit sizes.  Most times you'll only need about 5-10 seconds of drilling as you move to a larger size - since the drill will immediately catch/bite using the original hole and expand the hold to the new size.  Do all 2-3 rivets for the car (or cars if you are doing multiple cars at the same time) before switching to the next largest drill bit.  Eventually you'll almost completely (90%?) drill out the rivet and suddenly the remains of the rivet will break, and the car will suddenly pop apart.  Once you have 1 rivet popped, you can start pulling apart the baseplate from the top of the car, and the other rivet(s) will quickly pop as well.  

Most cars have 4 main pieces - the diecast body (top), the baseplate (metal on old cars, plastic on new cars), an interior, and the plastic glass, plus the 2 axles with wheels.  Older cars may have more than 4 pieces (opening doors are individual pieces, sometimes there are multiple body pieces, or separate grills, etc.).  It'll all be pretty obvious once you get the car apart.  

On older cars (which are my favorites - and so also my favorites to respray) the glass is often held in place with another rivet on the underside of the roof.  For the glass rivet, I actually use a really large (wide) drill bit, since if I start with a tiny drill and try to make a pilot hole I'll actually drill right through the roof.  Instead I just try to remove enough of the expanded part of the rivot to allow the glass to pull away from the roof.  

3.  Paint ONLY using spray paint:  Again - this is a fairly hard and fast rule.  Don't try to brush paint a car - since you'll have lots of brush marks at the end, and the paint won't be smooth.  Spray painting is THE way to go to get a nice, smooth, professional looking finish (more on this later).  I've brush painted trim (headlights, taillights, sometimes grills, etc.) with moderate success.  But I've had very little success brush paining body panels (like doing a 2 tone paint job) since again the paint often dries with visible rough paint marks, and my hand is just not steady enough to make clean and straight lines with a brush.

The one exception to the brush painting advice is interior plastic...  In real life I really like brown leather car interiors, and so I often brush paint interiors in a tan or chestnut shade.   For some reason the plastic doesn't show up brush strokes.  Paint the interior a normal color (sometimes the casting will have a green or purple or sparkly interior which is entirely unrealistic and which NEEDS to be changed), and change black interiors (black absorbs light and hides detail) to a color that can actually be seen!

Top 15 advice list:

15.  Don't even start this project if you are not detail oriented/a perfectionist!  It's finicky, intricate, detail oriented stuff that you are doing.  If you aren't detail oriented, or don't really care about it, then it's just not worth doing.  Save yourself the time now!  But on the other hand if you are detail oriented and you love your diecast cars, then re-spraying them into a new car is a very do-able and satisfying project!

14.  The final project will be cool - but it's debatable HOW much you'll like it and if you will think that the time and expense were justified in the end.  If there is a color variation that already exists in the same color that you want to paint it in, then just go on EBay and buy that color variation.  It'll be much easier and cheaper (and more valuable)!  

13.  The final product will be valueless:   In general, code 3 (customized) cars are not worth anything besides their curiosity value.  So DON'T paint a high value nice condition car (it's a bad investment - plus it'll piss off other collectors who will think you ruined it!).  YOU are probably the only person who will truly appreciate the end-product!

12.  Be realistic about the time required:  Painting cars always takes longer (a LOT longer) than I expect.  This is not a one hour project!  

11.  (Related to #12 above)  Do more than one car at a time:  Doing multiple cars allows you to pick up some volume efficiencies from doing each of the various steps.  But don't do TOO many cars - or else you'll get overwhelmed, you'll get tired and start to rush, or it'll get too hard to remember which parts go with which car.  In my opinion about 4-5 cars is the optimal number to do at any one time.  

10.  (Related to #12 above...)  Patience is key.  Don't rush, take your time.  It's ok to redo a step.  

9.  Choose your projects carefully:  Only do cars/castings that you really like.  If you don't like the casting design BEFORE you paint it, you won't like it that much more AFTER you paint it.  And if you don't like it, you won't be inspired to really put the time and energy and patience into making the final project look terrific.

Also consider the condition of the cars that you are doing.  While scratched window glass can be mostly repaired (dip the glass into a container of MopandGlo and let it dry - the MopandGlo will fill in the scratches amazingly), I've never figured out how to repair/unbend axles (though there are plenty of guys out there who CAN do this), and I've never figured out a good way to repaint wheels without having the new paint look all blobby.  So either be OK with the faded wheel paint, or replace them with new wheels from other donor cars (easier said than done - since the wheels and axles need to be the same size and width or they won't work!).  

In summary - do cars that are in poor enough condition that you don't feel bad about ruining their originality, but in good enough condition that the unrestored parts of them won't detract from the new paint

8.  Spray painting cars is both incredibly easy... ...but can also be surprisingly tough.  Do smooth passes, a few inches away from the car.  I put the car on a painting block that I made on 8 inch lengths of 2 inch wide pine boards, sitting on nails pounded into the board (to keep the bottom lip of the body from touching the block), which allows me to turn the block for different passes from different angles.  Do the passes slow enough that you get good paint coverage, but not so slow that the paint collects on it and starts to drip/run.  You DON'T want thick paint - it'll dry funny - and it obscures all the great Lesney detail that made you like the car in the first place!  If you get the paint on too thick, just wipe it off with paint thinner (a NECESSARY item to have for this project) and respray it.  Allow the paint to slightly dry (10-20 minutes) between coats.  Allow the paint to dry much more (several hours) before handling the casting AT ALL , or before turning the casting upside down to do the inside and bottom (as well as getting a different angle on the outside of the casting).  In the unlikely scenario that the paint is NOT covering and you keep on adding more coats and it continues to not cover - it's probably too wet and is running.  Let it dry (or if already too drippy - wipe it off and start over).  

7.  Choose your paint carefully.  Get several different colors and types of paints.  Some paints work great - others don't - even if they are from the same brand/type of paints.  

Choose your colors carefully as well.  Some colors look great - others just don't.  About 10-20% of the time I'll spray a car and then think that I just don't like the way the color looks - it's too dark, or too muted, or too crazy and unrealistic, or just wrong somehow, and I'll wipe it off and redo it in a different color.  

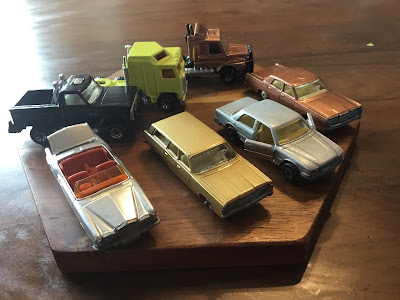
I've had REALLY good luck with metallic colors - bronzes, coppers, silvers, etc.  You'll see several of these colors in the photos of the recently done cars.  In fact, that bronze color on the Lesney Mercury sedan and Scania tractor is my FAVORITE paint color ever - I've probably done 10+ cars in that paint color (and it's a big standard sized Rustoleum spray paint can available for $5 from any WalMart/Home Depot).  When I first started spraying cars I used the little 4 inch Testor cans available from hobby Shops - but I'm not convinced that those Testor cans are any better than standard (and much cheaper on a per ounce basis) Rustoleum cans (though the Testor cans DO come in a wider variety of colors!).  

When choosing a color - think about how realistic it will be.  Most real cars are painted white, black, silver or red.  Unfortunately, I haven't had great luck with the particular white or red shades that I've tried so far.  And I don't like black since it hides rather than shows detail.  Painting a luxury car a wild shade of purple or lime green is going to look a bit odd, though those can be great colors for muscle cars.   

6.   You don't need to strip all the paint from the old casting, but consider sanding it a bit to hide any existing paint chips:  Using paint stripper is messy, gross, environmentally unfriendly and it adds a lot of time to the process.  Most spray paints will provide excellent color coverage, and you won't see the old paint once the new paint is on.  However, if the old paint was significantly chipped, you MAY see the outline of the chips clearly visible in the new paint.  Therefore while I've stopped stripping the castings, I DO use a Dremel tool with a wire brush wheel attached to quickly sand/smooth the old paint and smooth down any chips. I don't worry about getting every speck of the old paint off unless it is really thick and blobby, or if it is so thick that it hides important metal detail in the casting.

5.  Have fun and consider additional customizations while you've got the car apart.  There are lots of customizations that are possible to do to a car besides just painting it.  The Mercury sedan in the foreground of the right-hand photo only came in a police/fire car, with an emergency police/fire light (in various shapes) on the roof.  So before I painted this car, I first ground down the lip surrounding the light (with a dremel tool), then I filled in the light hole with metal solder.  While the final result isn't perfect (you can see that the roof isn't perfectly smooth), I'm still pretty happy with it, and I now have a normal (non-Police/Fire) sedan that was never actually made by Lesney!  

Other customizations that I've done include:  1.  Cutting the roof off and making a convertible (cutting the roof off is easy with a Dremel cutting blade, but reforming the back deck into the shape of a convertible top can be pretty difficult), 2.  doing base plate swaps with other versions of the same casting, 3.  changing wheels, 4.  eliminating or adding huge off-road wheels (be warned that this can be pretty hard, etc.  

4.  Be VERY careful of fingerprints:  Avoid any serious handling of the car until the paint has had a chance to harden (overnight is best).   If not, when you pressing the hood/trunk/roof of the car to re-mate it to the baseplate - you'll transfer your fingerprints into the paint.  Seriously.  Learn from my mistakes - I've done this mistake WAY too many times!  

3.  The paint on repainted castings is VERY fragile:  For some reasons, it chips really easily.  I estimate that a repainted car will chip about 10 times easier than original paint.  I've chipped repainted cars just placing them back into cases!  I don't know why this is - I've tried adding primer and clear coat and they don't seem to make much of a difference (but feel free to experiment yourself!)

2.  Skip the primer and clear coat: Although you'd think that primer and clear coat would provide more protection and more durability, I'm frankly not convinced.  They add additional painting time (and more importantly - drying time).  Primer adds the possibility of being sprayed on too thickly and obscuring detail.  And clear coat can change the color of a lighter paint shade.  At this point, I just don't feel that their benefits offset their disadvantages - but I'll keep on experimenting and maybe I'll change my mind again!

1.  Use superglue to put the whole thing back together:  Serious restorers tap new screws and screw the body back together.  But I've never figured out how to do this - and frankly - superglue is a lot easier! 

Finally, enjoy your new and unique look!

Sunday, March 13, 2016

Battle of the Full Size SUVs - Part 2: Who makes the best Chevrolet Suburban?!?

This post carries on my theme from a few weeks ago, when I compared 2 Matchbox castings of full-size SUVs - the Expedition from the late '90s with the Lincoln Navigator from the late '00s.  While the Navigator was the ultimate winner, I was thrilled to have both castings - both since they are great castings - and since I love (correctly scaled) models of full size SUVs. 
 
I'm a sports car guy in real life (RX7s, Miatas, 911s, etc.), but there is something naughtily enticing about these tough looking land yachts for the road...  And since the SUV revolution that started in about 1990 with the launch of the original Ford Explorer, Toyota 4-Runner, Nissan Pathfinder, Isuzu Trooper, etc., the toy makers have finally started to model these beasts in some nice detail... 
 
The modeling took a long time to come about...  Sure, in the '80s Hot Wheels had done the full size Ford Bronco, Matchbox the full size Blazer with off-road wheels in police guise and the '80s Cherokee (arguably the original contender in the '90s SUV craze) and Majorette the Cherokee with off-road wheels and a dog in the back (a favorite casting that I actually DON'T have), but they took a long time to respond to the next wave of SUVs... 
 
Majorette was the first to model one of them - with a nice casting of the 2nd generation 4-runner - most typically found in red.  Maisto produced a CRAPPY casting of the original Explorer (although it is so awful it doesn't really deserve mention).  But it was a long wait - until the Expedition and the Tahoe came out from Matchbox.  Some time in this range Matchbox also brought out a nice Jeep Grand Cherokee.  But then in Matchbox' mid '00s Renaissance they suddenly opened the floodgates and started producing some great models, like the Hummer H3, the Volvo XC90, the Jeep Liberty and the Nissan XTerra. 
 
But I digress.  This article is about the FULL-SIZE SUVs known as the Suburban.  Do we have any models of it - and if so - which is best? 
 
Ironically, Hot Wheels stepped into the scene as one of the first, with a non-regular-line-up Suburban that was too long to fit into a normal storage tray.  But since the Suburban is indeed a long vehicle in real life, it was right in scale.  I first saw this vehicle as a companion to their NASCAR race car series, frequently emblazoned with some race team's name on the side.  And this is the first model of it that I had - mine the blue one with the Square D electrical name on it.  But for this comparison, I showed my later one - a red "Team Bartwell" one done up with extra paint detail and rubber tires as part of their "Whips" series. 
This is a seriously nice casting.  As mentioned, the length is spot-on and gives it a lot of presence when compared to ordinary 1/64th scale vehicles.  Its a late '90s model, so its big and squared off - the way I like my SUVs.  The rubber tire, glossy paint and paint detail really finish off a beautiful casting.  The rims are BEAUTIFUL - MAGNIFICENT - EXQUISITE!    The only improvements I might make would be a metal base and opening doors or tailgate. 
 
Next up, and bought at roughly the same time, is a Code 3 collectibles fire chief suburban, a model of the same late '90s generation Suburban as the Hot Wheels. The size is right in line with the Hot Wheels, again too long for an ordinary storage case.  If anything, this model feels even more squared off than the Hot Wheels model.  This one is aimed at adults and again has great detail, with rubber tires, nice rims that are accurate replicas of the real Suburban rims, wipers, non-cast but attached mirrors, and excellent paint.  I would have loved to find this model in a normal consumer (non fire or police) version, but I don't think that one was ever made.  Interestingly, while the detail is more accurate on this one vs. the Hot Wheels, the Hot Wheels just feels more enticing...  The Code 3 is the one you want to have in your display case, while the Hot Wheels is the one you want to pull down and play with on the floor.   Advantage, Hot Wheels!
 
Next up is a JADA toys Dub version of the next generation newer Suburban.  I've never been a fan of JADA, since they often sacrifice realism in the name of crazy/fantasy customization, but this one was accurate and nice enough that I had to buy it.  It is in tan/bronze and looks much more rounded (too rounded for my tastes - though that generation of Suburban was more rounded - it wasn't as rounded as JADA made it).  This one has twin rear doors rather than a tailgate - a nice differentiating touch.  This is also the only version with a roof rack - though the body color paint that was applied to it makes it less appealing than the flat roofs of the others.  Typical of JADA it has big oversize rims and rubber tires.  The casting itself has a lot of detail, but little in the way of paint detail.  Overall, it comes off as a solid contender and a surprisingly nice casting, but is just not as nice as the first two... 
 
Finally, I have 2 Matchbox castings of the Suburban as a Police vehicle.  I talk about these last, since their size automatically relegates them to last place.  As an adult, correct scale is important - and these are scaled too small - smaller even than the Expedition/Navigator reviewed earlier - and smaller than Matchbox' own Tahoe that the Suburban is based off of (the 2 toys are roughly the same length - and since the Sub is longer in real life, the height and width of it has to be lower and narrower than the Tahoe to maintain consistency).  The scale issue is a killer... 
...but aside from the scale issue - it is an OK casting - and a NICE casting when in premium guise.  Matchbox had this odd run of premium cars where they would add opening doors to the premiums when they weren't available on the base model - meaning that the premium cars were no longer just nicer paint and rubber wheels - but were almost separate models.  I have an Impala police car with an opening trunk, and a Grand Cherokee, BMW X5 and this Suburban all with opening doors.  In the case of this Suburban, the detail really shines up the casting - meaning that it displays REALLY nicely!  Just don't put it beside something else that should have been smaller than it in real life! 

Thursday, May 7, 2015

Off-Road Lesney Matchbox Wildlife truck (Code 3)

Anyone ever see this variation of the mid-late '70s Matchbox Rolamatic Wildlife Truck? 

Looks pretty tough, right? 

OK, so its not entirely original...  ...and not genuine Lesney at all...  but instead a genuine John Carroll Code 3 variation of a favorite Lesney casting...  But regardless of its authenticity (or lack thereof) it IS super cool! 

And FYI - it rolls great - though I did need to modify the wheel arches a bit to get everything to fit!